
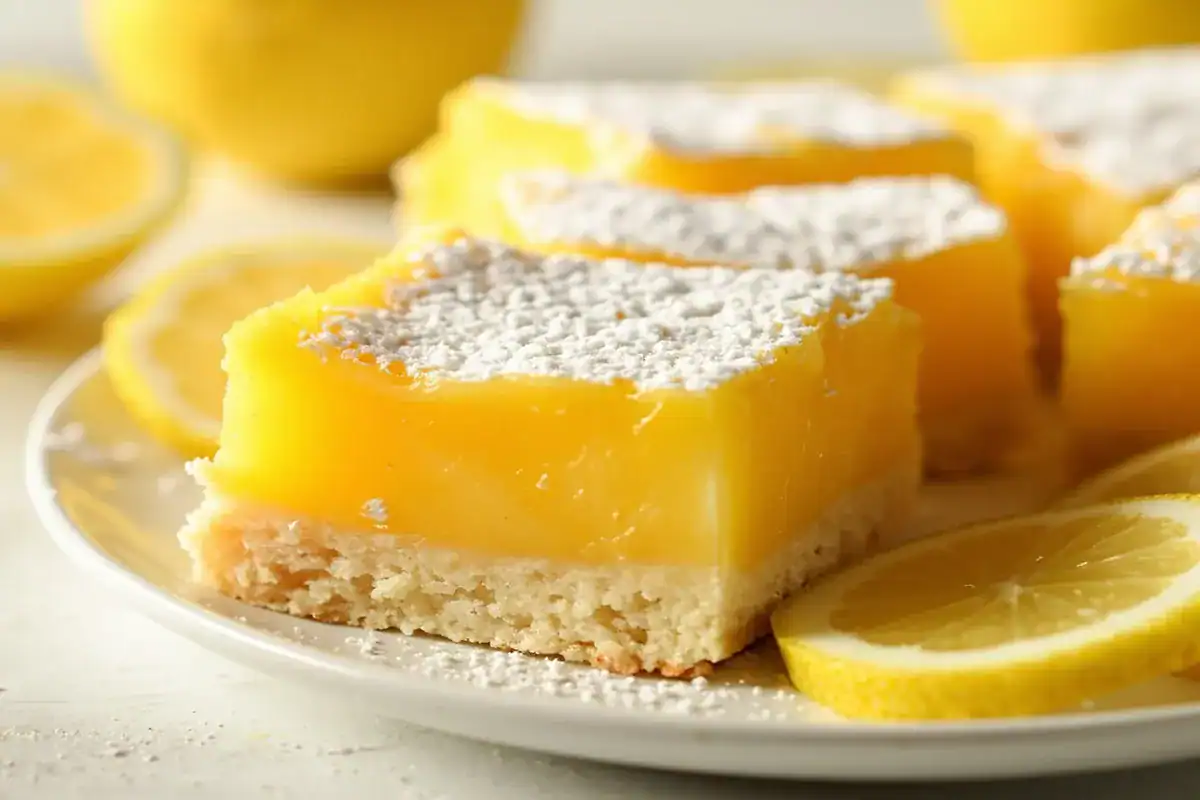
If you’ve ever tried to find a gluten-free lemon bar that actually tastes like the real deal, you know it can feel like a wild goose chase. Our family has been there too—especially when our boys were little and just discovering the magic of tangy, sweet treats. When we first started gluten-free, lemon bars were a huge miss until I nailed this recipe. It has just the right balance of tart lemon filling and a buttery, tender shortbread crust that holds up without crumbling into a mess.
This recipe matters because lemon bars are a classic dessert that can easily fall apart or taste off when made gluten-free. For celiacs and anyone avoiding gluten, cross-contamination is a real concern, so I always recommend using trusted gluten-free brands and double-checking every ingredient with tools like our /is-it-gluten-free/ checker. That peace of mind means you can enjoy dessert without worry.
We use Bob’s Red Mill 1-to-1 gluten-free flour blend here, which gives the crust a lovely texture and flavor. The lemon filling is bright and tangy, with just the right amount of sweetness to balance it out. This recipe has become a favorite around our kitchen table—perfect for holidays, potlucks, or simply a sunny afternoon treat.
❤️ Why You’ll Love This Recipe
- Bright, tangy lemon flavor that’s not too sweet
- Buttery shortbread crust that stays firm yet tender
- Uses reliable, easy-to-find gluten-free ingredients
- Great for celiac-safe baking with low cross-contamination risk
- Perfect make-ahead dessert that slices cleanly
Ingredients & What You Need to Know
The star of the crust is a gluten-free all-purpose flour blend. I recommend Bob’s Red Mill 1-to-1 because it contains xanthan gum and gives the shortbread a tender crumb without falling apart. King Arthur Gluten-Free Flour and Cup4Cup are other great options if you prefer those brands—they all provide reliable structure and texture. For the butter, real dairy butter gives the best flavor and richness to the crust, but you can swap it for vegan butter or coconut oil if needed.
Fresh lemons are non-negotiable here. The zest and juice create that signature tang that brightens the whole bar. Using bottled lemon juice just won’t give you the same fresh zing. The filling thickens nicely with cornstarch, which helps it set perfectly without being rubbery. And don’t forget the powdered sugar dusting for that classic finishing touch!
🔄 Substitutions & Swaps
- Dairy-free: Replace butter with coconut oil or vegan butter
- Egg-free: Use 1/2 cup unsweetened applesauce per egg or a commercial egg replacer
- Nut-free: This recipe is naturally nut-free, but double-check all ingredient labels for cross-contamination
- Low sugar: Reduce sugar in the filling by up to 1/4 cup but expect less sweetness
- Gluten-free flour: Swap Bob’s Red Mill for King Arthur Gluten-Free or Cup4Cup blends
Gluten-free baking can be tricky, especially when it comes to desserts like lemon bars that rely on a delicate balance of textures. The crust needs to be sturdy enough to hold the filling but tender enough to melt in your mouth. That’s why the choice of gluten-free flour and butter is so crucial here. Using a blend like Bob’s Red Mill 1-to-1 ensures the shortbread crust doesn’t crumble into dust or turn tough.
A common mistake is overbaking the lemon filling. You want it set but still a little jiggly in the center when it comes out of the oven because it will firm up as it cools and chills. Overbaking can result in a rubbery texture, which nobody wants. Also, don’t skip the chilling step—it really makes a difference in how cleanly these bars slice.
Serving suggestions? These lemon bars are fantastic on their own, but I love pairing them with a cup of strong black tea or a scoop of vanilla ice cream for a special treat. Our boys have always loved them just like they are—bright, tangy, and perfectly sweet. It’s a dessert that brings a bit of sunshine to any day, gluten-free or not.
How to Make Gluten-Free Lemon Bars
💡 Pro Tips Before You Start
- Use cold butter for the crust to get that perfect crumbly texture.
- Don’t overbake the lemon filling; it should still jiggle slightly in the middle when you take it out.
- Zest the lemons before juicing to make the process smoother and avoid losing zest in the pulp.
- Line your pan with parchment paper to lift the bars out easily without breaking.
- Chill the bars thoroughly before slicing to get clean, sharp edges.
🗄️ Storage & Make-Ahead
- Room Temperature: You can keep these lemon bars covered at room temperature for up to 2 days, but they’re best chilled.
- Refrigerator: Store in an airtight container in the fridge for up to 5 days to keep them fresh and firm.
- Freezer: Freeze the bars wrapped tightly in plastic wrap and foil for up to 3 months. Thaw overnight in the fridge before serving.
- Reheating: These bars are best served chilled or at room temperature, but you can warm individual pieces in the microwave for 10-15 seconds if desired.
-
2 cups gluten-free all-purpose flour (we use Bob’s Red Mill 1-to-1) -
1/2 cup granulated sugar -
1 cup unsalted butter, cold and cut into cubes -
1/4 teaspoon salt -
4 large eggs -
1 1/2 cups granulated sugar -
1/4 cup fresh lemon juice (about 2-3 lemons) -
1 tablespoon lemon zest -
1/4 cup gluten-free cornstarch -
powdered sugar for dusting
-
1Preheat and Prep
Preheat your oven to 350°F (175°C). Line a 9×13-inch baking dish with parchment paper, letting some hang over the edges for easy removal. -
2Make the Shortbread Crust
In a medium bowl, whisk together the gluten-free flour, sugar, and salt. Add the cold butter cubes and use a pastry cutter or your fingers to blend until the mixture resembles coarse crumbs. -
3Press and Bake the Crust
Press the mixture firmly into the bottom of the prepared pan. Bake for 18-22 minutes, or until the edges are just turning golden. Remove from oven and let cool slightly. -
4Prepare the Lemon Filling
In a separate bowl, whisk together the eggs, sugar, lemon juice, lemon zest, and cornstarch until fully combined and smooth. -
5Bake with Filling
Pour the lemon filling evenly over the warm crust. Return to the oven and bake for 18-20 minutes more, or until the filling is set but still slightly jiggly in the center. -
6Cool and Chill
Let the bars cool completely to room temperature, then refrigerate for at least 2 hours to fully set. -
7Slice and Serve
Use the parchment edges to lift the bars out of the pan. Dust with powdered sugar, slice into 16 squares, and enjoy!
Calories
Protein
Carbs
Fat
Fiber
Sugar
Sodium
Nutrition is estimated using a food database. Values may vary based on the specific brands and ingredients you use.
Frequently Asked Questions
Is Tangy Gluten-Free Lemon Bars with a Buttery Shortbread Crust gluten-free?
Yes! This recipe uses certified gluten-free flour blends and carefully selected ingredients to be safe for those with celiac disease or gluten sensitivities.
Can I make Tangy Gluten-Free Lemon Bars dairy-free?
Absolutely. Simply swap the butter in the crust for coconut oil or vegan butter to make this recipe dairy-free without sacrificing flavor.
Why did my Tangy Gluten-Free Lemon Bars turn out crumbly or dry?
This usually happens if the crust butter isn’t cold enough or if the bars were overbaked. Make sure to chill the butter and watch the baking times closely.
Can I freeze Tangy Gluten-Free Lemon Bars?
Yes, you can freeze them for up to 3 months. Wrap tightly in plastic and foil, then thaw overnight in the fridge before serving.
What gluten-free flour works best for Tangy Gluten-Free Lemon Bars?
Bob’s Red Mill 1-to-1 gluten-free flour is our top pick for the crust, but King Arthur Gluten-Free and Cup4Cup are also great choices. They provide the right structure and texture.
I hope this recipe for gluten-free lemon bars brings a little brightness and joy to your kitchen like it has to ours. Baking gluten-free desserts for our boys has taught me that with the right ingredients and a few pro tips, you don’t have to miss out on classic treats. If you try this recipe, I’d love to hear how it goes!
Don’t forget to explore more of our gluten-free recipes or use our handy /is-it-gluten-free/ checker to keep your family safe and happy. Here’s to many more delicious, worry-free moments with your loved ones!
We’d love to hear how it turned out! Leave a comment and a star rating below — your feedback helps other readers and means the world to us.
Rate This Recipe
Did you make this? We'd love to hear how it turned out!